7 Tips to Smoothly Move WordPress Blog to a New Web Host
It’s never an easy task when it comes to moving a WordPress blog to a new web host. There are plenty of reasons for changing a new web host. May be you’re unsatisfied with your current host provider’s features and supports. May be you found cheaper offers elsewhere or perhaps you simply need faster and more reliable web host to cope with your increasing web traffic. Regardless of any reason, many considerations need to be taken when you want to migrate your site from one web host to another otherwise the process could be frustrating.
To help insure a smooth moving process and to avoid unnecessary mistakes, below we’ve shared some valuable tips and advice. By reading through the blog post, we believe you can smoothly switch the web host without your visitors’ notice.
Reducing Domain Name’s Time to Live (TTL)
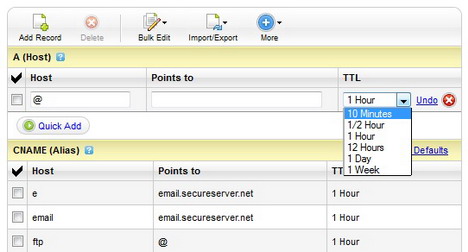
Time to Live (TTL) basically tells Internet name servers how frequent it should check your domain for a new location. To make testing your WordPress configuration easy you can shorten the TTL so that it can quicker point your domain to the new server. In the event of error happens shorter TTL helps to switch the domain back to old server preventing your site having hours of downtime.
To change TTL go to control panel of your web host and find the DNS manager. After that you may change the TTL (in seconds) from few hours to 5 – 10 minutes.
Setting Up a Test Sub-Domain to Try Your New Web Host
Before site migration it’s recommended to test your new web host by creating a test sub-domain name with DNS A record pointing to your new server’s IP address. With this method you can verify if your site works before switching over your primary domain name. For example, you can create an A record for test.mywebsite.com pointing to the IP address (e.g. 192.16.254.1) of your new server.
Likewise, after the site migration, you can create a second sub-domain name (e.g. old.mywebsite.com) pointing to the IP address of your old server for logging in and file accessing purposes.
Backing-up Database and Website’s Files
The first step of the entire transference process is to backing up your WordPress database and files. In fact it’s advisable to make creating backup a habit for every single job done and not just nstallation of your WordPress files.
To back up WordPress database, there are some awesome plugins such as WP-DBManager and WP-DB-Backup which you can use to perform the job in an easy way. Once the backup process is completed, you can get the copy of your database either by download or email.
For those who opt for manual approach, a FTP (file transfer protocol) program like FileZilla can be useful in connecting to your host where you can copy all your WordPress files including code files, theme files, plugins, media uploads, .htaccess file and locate them under a new directory in your local computer’s folder. The time duration for this transfer depends on the media files available in your site.
Exporting WordPress Database with phpMyAdmin
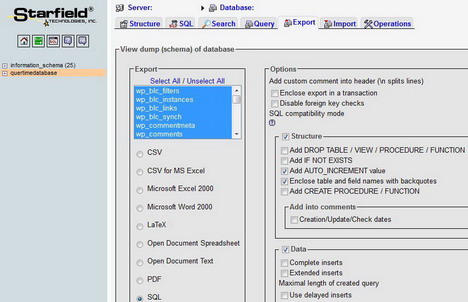
Exporting WordPress database is one of the imperative backup processes that can be done within a few steps. To get it started, you need to login to your current web host’s control panel and look for ‘MySQL’ option which is commonly categorized under ‘Databases’. You can then open phpMyAdmin app and on the left sidebar select the database that contains your WordPress installation. After that click the ‘Export’ on the navigation menu followed by ‘Select All’, then make sure all the files to be exported in SQL format. Now enter a name and press ‘go’ button to export the WordPress database to your local computer. Click here for more details on exporting a database with phpMyAdmin.
Adding WordPress Database on Your New Web Host
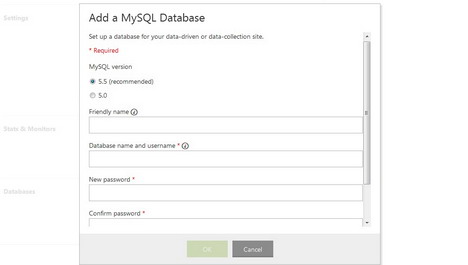
It is essential to create a database on your new host that enables successful import of SQL data. All you need to do is to login to your new hosting account’s control panel and go to ‘MySQL’ which is categorized under ‘Databases’. Now click on ‘Add’ button and create a new MySQL database by giving it a name / username and a password. That’s it!
Editing wp-config.php File
Wp-config.php is one of the most essential files in the WordPress installation. It’s located in the root of the WordPress file directory and contains database connection information such as hostname, username and password. Through this information wp-config.php can communicate with database for storing and retrieving data including posts, users, comments and miscellaneous settings.
Now go to open the file and change the database details below. Before the alteration it’s advisable to make a copy of the file as a preventive measure for any mistake happens later.
- MySQL database username
- MySQL database password
- MySQL hostname
Importing Database to Your New Web Host
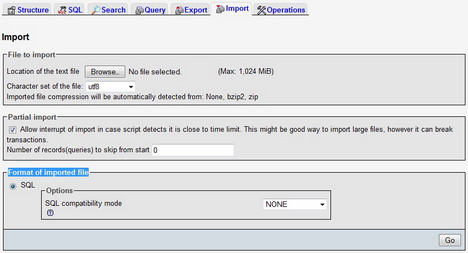
Once all the steps above are completed now it’s time to import the SQL database file. Again, go to your new host’s control panel to launch the phpMyadmin app. From the left sidebar, select the new and empty database you’ve added then select ‘Import’ from the navigation menu at the top. In the ‘File to import’ section click on ‘Browse’ button and select the SQL file you’ve previously backed-up. After making sure the imported file format is SQL you can then click on ‘go’ button to begin the import process.
You May Also Like:
 Easy Way to Back up Your WordPress Blog to Dropbox
 Best WordPress Database and Files Backup Plugins for Your Blog
 Top 14 of Best WordPress Caching Plugins to Speed Up Your Blog
 Important Tips on How to Choose the Best Blog Host for Blogging
 12 WordPress Tips & Tricks to Improve Your Blog’s Traffic
 How to Create a Custom Error 404 Page for WordPress Blog
 How to Setup and Configure WP Super Cache Plugin for WordPress Blog
 10 SEO Tips: How to Optimize WordPress Blog
Tags: database, tips & tricks, web development resources, wordpress resources