How to Setup and Configure WP Super Cache Plugin for WordPress Blog
WP Super Cache and W3 Total Cache are commonly used caching plugins to improve the performance of WordPress blogs. However these two plugins are not recommended to be installed together as they might conflict with each other. That’s the reason why many bloggers are trying to find out which one is better for improving server performance, reducing download times, caching site, and most importantly speeding up the page load time.
We at Quertime.com have been using both WP Super Cache and W3 Total Cache for a pretty long period of time. After comparing the two plugins, we’ve decided to stick with the latter. This is because WP Super Cache is easier to setup and configure, and more importantly the plugin managed to reduce the page load time of our site up to 50 percent, which is very impressive.
At the time of writing, the download times of W3 Total Cache is about 1 million while WP Super Cache has already exceeded 3 millions. Obviously the majority of WordPress bloggers in favour of WP Super Cache plugin.
We’ve previously written a tutorial to guide WordPress users configuring W3 Total Cache plugin for better performance. Today we would like to do the same for WP Super Cache. After following below step-by-step instruction, you’ll able to fully configure the caching plugin enhancing your site’s overall performance. We hope this tutorial helps to increase your visitor time on site and improve user experience.
How WP Super Cache Works?
In short, once WP Super Cache plugin is installed on your WordPress blog, it creates static HTML files. Your web server will serve those files instead of processing the heavier WordPress PHP scripts to improve the overall site performance.
WP Super Cache serves cached files in 3 ways, Mod_Rewrite, PHP caching and Legacy caching. Mod_Rewrite is the fastest method followed by the other two. If you are new to caching use PHP caching because it’s easy to setup and almost as fast as Mod_Rewrite.
Configuring WP Super Cache Settings for Better Site Performance
1. In the left sidebar of the WordPress dashboard, go to “Settings” and then click on “WP Super Cache”.
2. Under “Easy” tab, select “Caching On (Recommended)” and then click on “Update Status”.

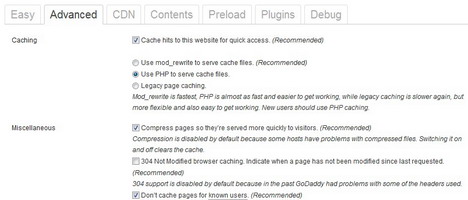
3. Under “Advanced” tab, enable the following options:-

- Cache hits to this website for quick access. (Recommended)
- Use PHP to serve cache files.
- Compress pages so they’re served more quickly to visitors. (Recommended)
- Don’t cache pages for known users. (Recommended)
- Cache rebuild. Serve a supercache file to anonymous users while a new file is being generated. (Recommended)
- Mobile device support.
- Extra homepage checks. (Very occasionally stops homepage caching) (Recommended)
4. Done, WP Super Cache plugin is now completely optimized for your site.
Note: You’ll have to set up a custom permalink structure for the plugin to work correctly. For more information, you may check out the WP Super Cache’s FAQ.
Tags: free download, how to, plugin, tutorial, web development resources, wordpress resources


