The Fundamentals of Studio Lighting in Photography
Photography is an art wherein real-life moments are captured and immortalized for a lifetime. This art can only be accomplished by the most passionate, who can execute gleefully. Light is the bedrock of photography, be it studio photography or outdoor photography. Lighting is a major natural component that plays a vital role in the characteristics of a captured image or picture. Light signifies all the appearance and effects of a photograph, so it is advisable to know about the role of light in photography in order to enhance the quality of photographs captured. The word ‘photography’ is derived from the word ‘photo’ which means light and ‘graphy’ which means writing.
Before elaborating on the fundamentals of studio lighting it is mandatory to have an understanding of the role of lighting in photography. There are seven fundamental characteristics of light in photography: Exposure – it determines the brightness and effects of an image, Quality – determines how diffused or focused the light is, Color – determine the light color in a picture, Direction – shows where the source of light is from, Highlight – shows the brightest section of the picture, Shadow is the darkest section of a picture, and finally Contrast, which is the difference between the brightest part of a picture and the darkest part of a picture.
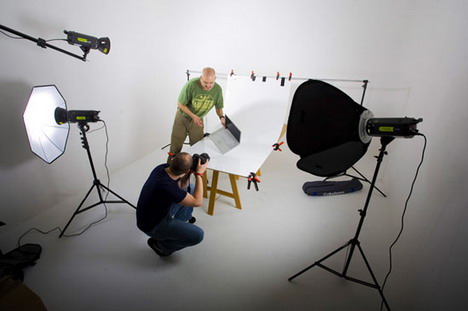
Professional photographers use lighting equipments like reflectors, diffusers, and grid spots in order to capture the perfect picture. Professional photographers often contemplate on the issue of setting up the perfect lighting environment suitable for an engaging photo shoot. In order to set the right lighting environment, they rely on lighting sources, modifiers that control light spread, and stands that support the light sources. A professional photographer gets the best of the strobe light in order to understand and appreciate the virtues of light. Now let me elaborate on the fundamental elements required for studio lighting:
Studio Lighting Sources
There are two types of professional studio lighting sources: the first one is a photographic kit with flash head and the second one is a power pack with a mono light kit. The power pack kit is comprised of a small power pack and a flash head that functions as a generator providing power to the flash head. The flash head incorporates flash tubes that require high voltages in order to emit light. When it comes to power pack types, there are two types: symmetric and asymmetric. The main difference between symmetric and asymmetric power packs is that former splits power evenly between the flash heads, while the later facilitates the user to alter the power supply to the flash heads. Another important lighting source is mono light, which is a close-packed substitute for power pack and flash head combos.
The size of the source limits the power, but they offset it with the portability feature. Mono lights are equipped with in-built light controls, so if you require multiple mono light sources then you have to adjust all their settings individually. The major setback with mono lights is that they provide slower flash durations when compared to head and power pack kits, which makes it difficult to freeze an action when shooting fast motion. For outdoor photography, head and power pack kits would be viable choice as they can work along with complex modifier setups and can also provide ample light to overcome the sun light and light loss caused by modifiers. For studio photography, mono light sources are the ideal choice as they compact and require less power. The prices of these equipments vary broadly and at times are expensive too, so it is wise to look out for used equipment that is reasonably priced and affordable.
Grips, Stands & Light Modifiers
Grips and stands are objects that support light modifiers, sources, and strobes. Lightweight and C stands are the two most commonly used stands. Both these stands are available in different sizes and lengths. Of the two types, C stands are heavy and do not have air shocks, whereas lightweight stands come with air shock feature and also cost you a few extra bucks. The air shock feature will cushion the light fall, thereby minimizing any damage. There are stands that come with footprints and legs that are spread apart. These types of stands provide a stable setup and ensure that the light source do not tumble over.
Umbrellas and softboxes are the two commonly used light modifiers. Umbrellas produce diffused and soft light as they have a larger reflecting surface. Umbrellas are placed in a way that they are faced away from the target object or model. Light rays from the source hit the inner part of the umbrella and then reflect back. Umbrellas come with different linings, silver-lined and gold tinted umbrellas are the most commonly used ones. Silver-lined and gold-tinted umbrellas are efficient and can center the light source more narrowly. Softboxes are square and rectangular in shape with a reflective inner section and a translucent exterior. These lightweight boxes are available in a variety of sizes and shapes, and can be attached to the front side of a light source.
The prime difference between softboxes and umbrellas is that the light spread is more confined with softboxes, whereas it is spills beyond boundaries with umbrellas. Such spilled light can hit any object and reflect back and forth inside a confined space. So, professional photographers always prefer softboxes over umbrellas. Other notable light modifiers are honeycomb grids and flags. Honeycomb grids direct light evenly over a space and are available in different degrees. Whereas a flag is a kind of opaque object that is placed in the direction of light in order to avert lens flare. Semi-translucent flags are also widely used to bring down light spill.
These are the fundamental elements that are required for a perfect studio lighting setup. Though there are a collection of lighting equipments available in the marketplace, choose wisely and go for the kits that suit your style of photography. More importantly, start with the basic equipment and then build on it by adding accessories as required for the environment. Hope these elaborations and descriptions were helpful, and provided you some insight on the concept of studio lighting.
Tags: photography


