How to Add SSL / HTTPS to WordPress Site – Complete Guide
It is but normal for you to encounter a new website on the World Wide Web, with every passing day. Given this phenomenal increase in the number of websites, there comes a pressing need to take stringent security measures so as to safeguard all the online information. Given the fact that all these web applications come with a host of vulnerabilities that can easily be exploited by hackers, web owners should be armed with certain security tools that can tighten the security of their internal data.
Pros and Cons of WordPress Sites
It is well known that WordPress is recognized as the most popular Content Management System that is employed by almost all the websites across the globe. However, this global acceptance has a flipside to it. Its popularity is also the main reason behind hackers targeting most of the websites.
However, as an owner of a WordPress site, you need not worry about its security when you have some excellent alternatives. You have help at hand in the form of an SSL certificate which allows you the luxury of multiple layers of security. The Secure Socket Layer (SSL) certificate comes across as a standard means to secure your WordPress site through a process called encryption. Establishing a secured channel of communication between your web browser and your web server, encryption is an efficient way to secure all your crucial information. For all those who are looking at installing an SSL certificate along with a HTTPS protocol to their WordPress site, here is a complete, step-by-step guide that will come handy.
Step 1. The Significance of an SSL Certificate and an SSL Certificate Provider
An SSL certificate is majorly meant to safeguard the confidential information of your users. This includes their card numbers, registration details, login credentials and other types of online information shared in the form of forms. However, you need to sign up with a renowned SSL Certificate Provider who issues you an SSL Certificate that can be installed on to your WordPress site. And for this, you may check out Cheap SSL from SSL2BUY.
Step 2. Pick from a Wide Array of SSL Products
SSL2BUY can be termed as the one-stop-shop for a host of popular web security global brands offering including Symantec, Thawte, RapidSSL, Globalsign, AlphaSSL, Geotrust and Comodo. Through this platform, you can pick Domain Validation, Organization Validation and Extended Validation certificates that can secure a single domain, multiple domains, sub domains (Wildcard) and exchange server (UCC).
After you have signed up, you are all set to initiate the process of adding the chosen SSL Certificate to your WordPress site. However, your first step would be to test the SSL certificate. Here is how you can do it.
Step 3. Testing the SSL Certificate
You may test your SSL Certificate using a number of online tools that are readily available on the internet. One such tool is the SSL Server Test, a product of SSLLabs. This is a free tool that can verify whether you have properly installed the SSL Certificate along with looking into the specifications of configuring it on your WordPress site. After running the test, the following image will pop up on your screen, confirming that your domain can be redirected from the HTTP to the secure HTTPS protocol.
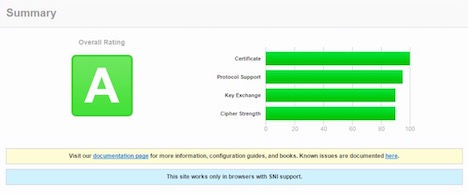
This is indicative of the fact that your domain is all set to run on the HTTPS protocol. You may test by visiting both your domain versions, http://example.com and https://example.com and you will be notice that your domain is now compatible with both the HTTP and HTTPS protocols. But this should not be the case as you wish to redirect your domain to the secured HTTPS protocol through your SSL certificate.
To ensure that your domain exclusively runs on the HTTPS protocol, you need to force your domain. And this is done by the following step.
Step 4. Redirect from HTTP to HTTPS – How To Go About It?
The process of redirecting your domain from HTTP to HTTPS calls for the creation of a rule in the .htaccess file linked to your WordPress site. Once you establish this rule, you can effortlessly redirect from the HTTP to the HTTPS protocol. To initiate this action, you need to log into your hosting account through the FTP. You then need to navigate to the root directory of your WordPress for you to access the .htaccess file using a text editor. You need to paste the following instructions on the text editor file, just below the “RewriteEngine On”.
RewriteCond %{HTTPS} off
RewriteCond %{HTTP:X-Forwarded-Proto} !https
RewriteRule ^(.*)$
https://%{HTTP_HOST}%{REQUEST_URI} [L,R=301]
The above instructions will permit visitors to automatically get connected to the HTTPS URL, even if they keyed in http://example.com.
Step 5. Convert All Your Internal URLs to HTTPS
Given that your WordPress site is online with loads of internal data and online content, you need to simply change all the internal URLs to get redirected to the HTTPS protocol. To initiate this action, you need to navigate to ‘Settings’, followed by choosing the ‘General’ tab. Post that, you can see the option which reads: WordPress Address & Site Address. Selecting this option will help you replace all the HTTP with HTTPS. Once this is done, all you need to is to click the ‘Save Changes’ tab at the bottom of your page.
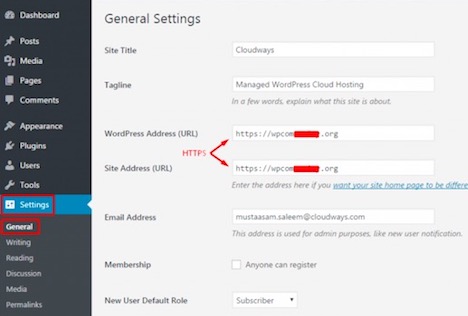
This step will ensure that your internal URLs conform to the HTTPS protocol.
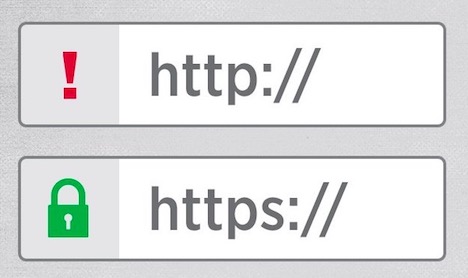
Step 6. Avoid Warnings by Scanning for Missed Out HTTP URLs
Despite your efforts to redirect all your internal URLs from HTTP to HTTPS, there is every possibility that some of your online content is still linked to HTTP. All such pages will show up a warning icon instead of the secured green padlock on their address bar. So, your next step is to steer clear of all such missed out HTTP pages and replacing them with the HTTPS protocol. To identify all such HTTP pages, you may rely on some free brilliant online tools that are available on the net. For this, you may pick up the WhyNoPadlock that can effectively scan your WordPress site for any non-secure content, uncovering the pages that are left out with HTTP URLs.
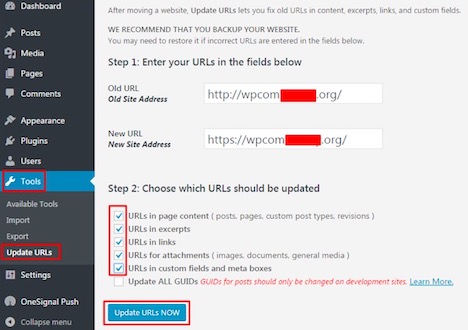
Step 7. Update the Detected HTTP URLs to Your New Domain
After you have identified the HTTP URLs, the next step would be to update and fix them. For this, you may take the help of Velvet Blues, a quick and simplified plugin that updates all your old URLs and links that are existing in your web content, Meta Boxes, custom fields and excerpts, to your new domain name. All you need to do is to install and activate the plugin, by following the instructions below:
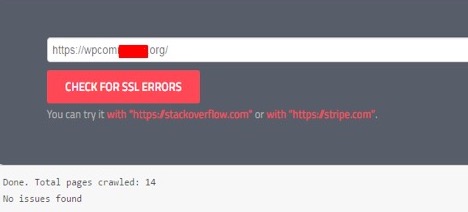
Step 8. Check the Migration from HTTP to HTTPS
This completes the replacement of old URLs with the new domain name. To check whether the migration was complete, you may check the HTTP URLs again, for you to see the following result.
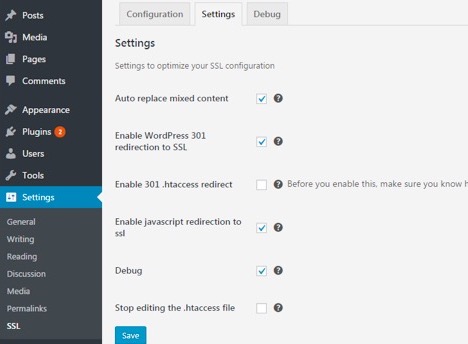
Step 9. Another Multi-Purpose Plugin to Configure Your WordPress Site to HTPPS
Really Simple SSL is another exceptional plugin that will automatically move your entire WordPress site to SSL. After you have access to your SSL certificate, you need to activate this plugin and you are all covered. This plugin will enable SSL to your entire website, just with a single click.
Below are the easy-to-follow instructions to perform this action.
You need to install and activate this plugin from the WordPress admin dashboard. Subsequently, you need to navigate to Settings -> SSL -> Settings tab. Post this selection, you will be able to configure your website according to your choice.
Step 10. Configuring All Your HTTPS URLs in Google Analytics
After completing the above intermediate stages, you are just one more step away from the most important part of adding SSL and HTTPS to your site. And this step is about having a close watch on your online visitors. For this, you will have to configure all the HTTPS URLs in Google Analytics so that you can track your visitors.
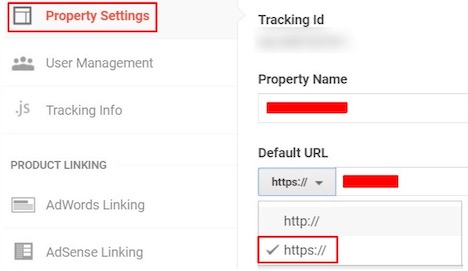
To perform this task, you need to navigate to your Google Analytics account after which you need to navigate to the Admin option. Here, you need to choose your specific property and click the Property Settings tab. After that, you need to change the Default URL to HTTPS. The screenshot below can assist you perform this action.
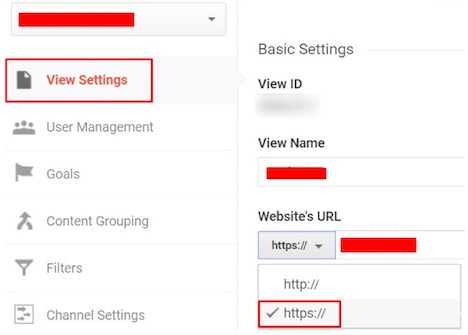
Then, you need to navigate to the View tab by going back to the earlier screen for you to select View Settings. This is where you will be able to completely change your WordPress URL to HTTPS.
The successful completion of the above-described 11 steps will help you integrate your chosen SSL certificate from SSL2BUY to your WordPress site.
Conclusion
The above step-by-step guide to install an SSL certificate, migrating all the old HTTP URLs to HTTPS can also help you keep a close watch on the actions of your visitors, through the Google Analytics tool. In the event you are looking for some additional ways to build a strong wall of security to your site, you may check out the list of WordPress security plugins. These security plugins can go a long way in safeguarding your WordPress site from hackers and data breaches.
You May Also Like:
 How to Turn WordPress Blog into an Online Store or e-Commerce Site
 How to Add or Integrate Google+ Plus into Your WordPress Site
 Easy Way to Back up Your WordPress Blog to Dropbox
 Step by Step Guide for Small Business Owners to Cheaply and Effectively Build a Website
 Top 5 Best WordPress Search Engine Plugins
 20 WordPress Plugins to Interlink Blog Posts, Pages & Keywords
 How to Setup and Configure WP Super Cache Plugin for WordPress Blog
 How to Check Broken Links and Dead Links in Website or WordPress Blog Using Broken Link Checker Plugin
Tags: how to, privacy & security, tips & tricks, tutorial, wordpress resources