How to Set Google DNS on iPhone, iPad and iPod Touch
Just like changing DNS settings on your computer, you can do the same on your Apple devices like iPhone, iPad and iPod Touch. By enabling Google DNS or OpenDNS, your Apple devices able to run faster and safer on the web compared to most of the default Internet service provider’s DNS servers. Currently we can’t change the DNS settings on cellular Internet connection, but the iOS does allow us to modify the WIFI DNS settings. In today’s tutorial, we’ll show you how to switch your WIFI’s default DNS settings to Google DNS with just a few simple steps!
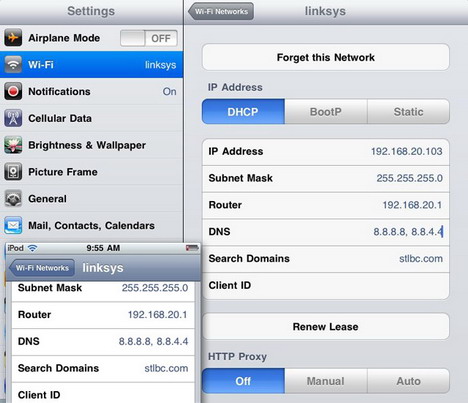
1. Connect your iPhone, iPad or iPod Touch to WIFI, then tap the blue arrow beside the network name.
2. Tap “DHCP” and then enter DNS settings you want. In this case, you can enter Google DNS “8.8.8.8, 8.8.4.4”. Remember to separate different DNS addresses with comma.
Beside Google DNS, you may try other common DNS services as follows:-
- OpenDNS
208.67.222.222, 208.67.220.220 - Norton DNS
198.153.192.1, 198.153.194.1 - Comodo Secure DNS
8.26.56.26, 156.154.70.22
3. Now your Apple device’s WIFI default DNS setting has been changed to Google DNS. You can experience the difference by browsing the web.
Note: You’ll have to change the DNS setting every time you connect to a new network.
What’s your favorite DNS? Let us know in the comments section below.


