How to Protect Your Post Privacy on Facebook
Facebook is the best place for sharing your status updates with family and friends. However, sometimes you might have some interesting outdoor activities which you want to share with your friends only and not your colleagues. Or there are some personal things that can only be shared with your family members and not the others. To manage your post privacy, you should keep these people separated, putting them into groups like family, close friends, colleagues, acquaintances, etc. This helps you to easily share information with relevant people and avoid some sensitive data to be seen by others.
Below we’ve written 2 step-by-step tutorials guiding you to create a friend list of your own on Facebook as well as restrict certain people from seeing your posts. We hope these simple tutorials and screenshots are helpful for protecting your post privacy.
How to Create a Friend List on Facebook
1. Sign into your Facebook
2. On the left sidebar, click on ‘More’ link next to ‘Friends’.

3. Hit the ‘Create List’ button. You’ll see a new menu pops up, give your list a name and then add people to the list by typing their names.

4. Now, the new list you’ve just created will appear on the left sidebar, under ‘Friends’.

How to Limit Who Can See Your Posts on Facebook
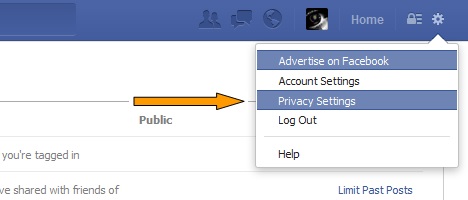
1. Click on the gear icon in the top-right corner and then select ‘Privacy Settings’.
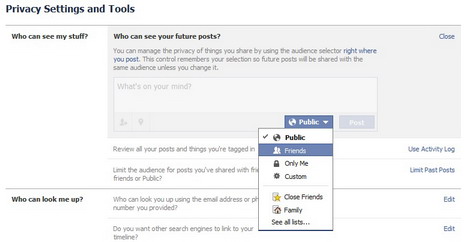
2. You can decide which group of people see your posts. To do that, click on ‘Edit’ next to ‘Who can see my stuff’.
3. Click on the drop-down menu where you can select the audience (Public, Friends, Only Me, Custom, etc.) you want for your future posts.
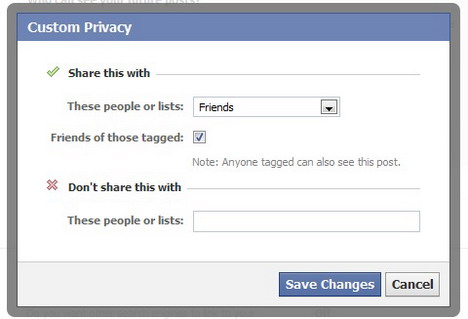
If you choose ‘Custom’, a new menu will pop up allowing you to choose the group of people whom you want to share (or don’t want to share) your posts with.
Facebook has another privacy tool that allows you to limit the audience for old posts on your Timeline. To do that, click on “Limit Past Posts” and then hit the “Limit Old Posts”.

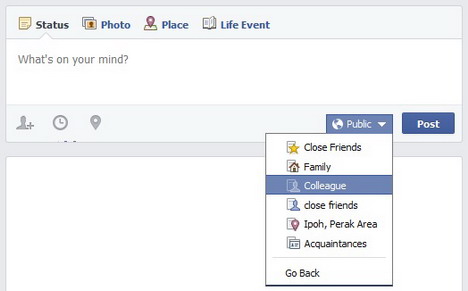
When you want to publish a new post, Facebook provides you ‘Post Privacy Setting’ where you can choose the audience of your post. To do that, click on the drop-down menu next to ‘Post’ button and then select your target audience.
You May Also Like:
 7 Facebook Privacy Tips – How to Protect Your Privacy on Facebook
 Latest Facebook Privacy and Security Features to Protect Users
 15 Tweaks to Customize Your Facebook News Feed
 How to Create Private, Closed or Secret Group on Facebook
 20 Tips to Protect Your Data Privacy on Facebook
 8 Easy Tips to Protect Your Facebook Account from Hackers
 How to Unblock Friends or People on Facebook
 6 Helpful Tips to Better Manage your Facebook News Feeds
Tags: facebook, privacy & security, social media, tutorial
Comments are closed.


