15 Tips To Access, Manage and Delete Google Usage History
The world where we live nowadays is connected. As a result, every individual in today’s world who uses a computer or a mobile device will instantly know what the people around the world are doing. Information that when processed by every individual will collectively show the path for evolution which brings different behavior in society and ultimately changes the way that people live. This can be useful if we use it at the correct time. Some information cannot be useful after a period of time. Some information that isn’t useful at times is the browser history on your computer.

Browser history is a report that will tell where you have been on the World Wide Web. It can be used to help you to go back to a place you would need to gain access to again. But, as information, it can be stored and gathered, and of course, will take storage from your devices. When storage is taken, it can slow your computer down immensely which can be highly frustrating for the device user. If you’re experiencing this, then below are some useful and helpful tips to use to help you gain access, delete, or manage Google usage history. Let’s get started.
Let me tell you that Google will let us manipulate the footprints we leave when navigating with them.

As the primary account holder, you can actually view and control the activity on your account. After you have signed into your Google account, direct yourself to the “My Activity” field. Here you will find detailed information like what searches you have done. In there, you can then choose how you want to find and view the activity.
1. Delete Items individually by using the search or filters, or directly recognize the item you want to delete, choose “more” > “delete”.
2. Delete Related Activity by recognizing the bundle you want to delete. At the top of it choose “more” > “delete”.
3. If you want to find the information specifying the search and date, go to “My Activity” select the search bar, or filter by date & product. After you have entered a search term you can add a date of range, and also tell Google which products to include.
4. For deleting the search results select “more” and if you want to delete certain results, select it, click or tap the item to be deleted and on the top right choose “delete”. But if you want to delete all results definitely choose “delete results”.
5. It is very easy to delete activity by date range. Go to “My Activity” and on the “My Activity” banner, choose “more” > “delete activity by” > “choose the range and select” > “delete”.
6. If you prefer to delete all the activity saved in “My Activity” go to the “My Activity”, choose “more” > “delete activity by” > below the “delete by date” option choose the down arrow > “all time” > “delete”.
7. Another way of managing activity is to stop saving the activity. Prevent the searches and browsing history from being searched, enter the “Activity Control” and “turn off” the switch and confirm by selecting “pause”.
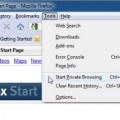
8. For a temporary prevention of information saving, you can search and browse the web privately by going to chrome > on the top right select “new incognito tab”; which means that you can open a window and navigate the internet in private without Chrome saving the sites you have visited.
9. In the keyboard on windows, Linux or Chrome OS press “Ctrl + Shift + n” and for Mac you may press “⌘ + Shift + n”. To exit the incognito mode, just exit as usual by closing the window with the “X” at the top corner.
10. If the information you deleted is still showing up in “My Activity” you might want to make sure that the device is connected to the internet, and if the other device is being connected to the internet it will automatically be removed.
11. To delete your browsing data information on your computer open Chrome > in the top right click “more (the 3 dots)” then select > “more tools” > “clear browsing data”. To delete everything select “beginning of time” > “clear browsing data”.
12. Perhaps you want to delete specific items and not the entire category of the browsing information data. At Chrome select “more” > “history” > check the box next to each webpage you would want to remove for your history and at the top of the page click “remove selected items”.
13. You can also delete specific passwords by opening Chrome in your computer click “more” > “settings” > at the bottom select “show advanced settings” > under “password and forms” click “manage passwords”. A box will open showing up a list of passwords, then select the website in the “saved passwords” and click “delete”.
14. Maybe you don’t want to make the step above any time you have the need to, for this, Chrome will let you order it to stop asking to save the passwords. Open Chrome on your computer, go to “Settings” at the top right, afterwards go to the bottom and click “show advanced setting”. Under the “password and forms” uncheck the square next to “Use smart lock for passwords to remember passwords for apps and sites” or “Offer to save your web passwords.”
15. Probably you just told Chrome, as above, to stop saving the passwords, but now you want it to do the other way around. Make Chrome to save passwords by re-entering the web page > “sign in” > and when Chrome asks to save password > select “save password” or “yes”.

You May Also Like:
 How to Delete Internet History or Browsing History from Web Browsers – Internet Explorer, Mozilla Firefox, Google Chrome, Apple Safari, and Opera
 How to Delete Search History or Web History from Your Google Account
 How to Use Mozilla Firefox to Browse Internet without Saving any Web History, Cookies and Temporary Internet Files
 How to Browse Privately in Google Chrome Using Incognito Mode
 20 Cool Tips to Speed up Google Chrome
 How to Delete Personal Information & Data from Google
 25 Most Wanted Tips for Private Browsing
 10 URLs to Find out What Google Knows About You
Tags: google, google chrome, tips & tricks, web browser